Featured Post

Web API Requests Series

Web API Series:  Create and Retrieve , Update and Delete , Retrieve Multiple , Associate/Disassociate , Impersonation , Run Workflows

21 April 2011

How to display a Silverlight application in the home page grid.

Hi everyone, in this post I am going to show how to display a Silverlight application in the main page grid by customising the navigation pane site map.
First of all add the site map to an unmanaged solution and export the solution, open the customizations.xml file in Visual Studio, associate it with the customizationSolution.xsd located in the SDK\Schemas folder in the SDK download package. To associate the customizations.xml file with the xsd file: in Visual studio press F4, this will show the property pane, click on schemas then "...", click add..., navigate to the folder select the file and click OK.

In order to be able to show a Silverlight application in the main page grid we need to create a web resources for both the Silverlight xap application and the HTML web page that hosts the Silverlight app (chek this post on how to create a Silverlight web resource) then reference the web page from the site map with the "$webresource:" directive see example below.


These few lines of code add a new group within the Workplace area and a new sub area within the group.


And this is the result, hope this helps someone.
HAPPY EASTER!!!

14 April 2011

08 April 2011

How to create Silverlight Web Resources

In this article I will talk about how to create a Silverlight application and add it as a Web Resource in Microsoft Dynamics CRM 2011, and then embed it in an entity form.
First of all create a new Silverlight 4 project in Visual Studio:


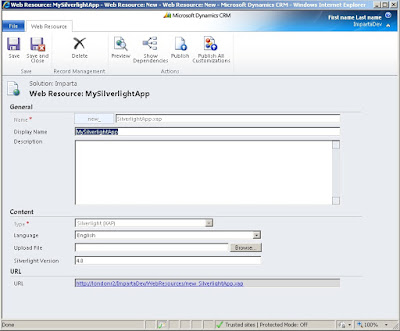
Creating a Silverlight web resource is nothing different from creating any other web resource in CRM 2011, it is just a matter of creating the application,as we did above, creating  new web resource as shown below, giving a name, a display name, type and uploading the file (xap).


After having created the web resource we will need to add it to an entity form, in my case the entity is an opportunity. Open an opportunity select the customize tab and then click on Form, add a Tab by choosing the Insert tab as shown below, add a web resource and check the "Pass record object-type code and unique identifier as parameter"(see this post).


Save publish and reload the opportunity entity, you should be able to see your Silverlight applicaiton inside the newly created tab.
This is how my Silverlight application looks like inside a form entity.

Silverlight app outside CRM context

Recently I have been working on a project where I needed to create a Silverlight application that ran outside the CRM context and I needed to pass parameters to the applicaiton from CRM context.
In a previous post I have talked of how to pass parameter to a Silverlight web resource within CRM context.
So, likely in this project the Silverlight application was not totally disconnected from CRM(of course) but it was launched by clicking a custom ribbon button from CRM. This, in fact, made things a little bit easier.
When you customize the ribbon menu in CRM 2011 by adding a new button for example, you may want to pass input parameter to a Java Script function for instance, well this is possible by adding the appropriate tags to the customization.
Let's start from exporting the customization from our CRM organization, extract the archive, open the customization.xml file with Visual Studio or another XML editing application that supports XSD schema validation. "This will help avoid XML validation errors when you import the ribbon. Associate the customizations.xml file with the customizationsSolution.xsd file. You can find this schema in the SDK\Schemas\CustomizationsSolutions.xsd file in the SDK download package."(from the CRM 2011 SDK).
Alternatively you can export only the Ribbon by creating a new unmanaged solution for this purpose, this will reduce the amont of data that you export/import and time.
Once you have downloaded the solution open the customizations.xml with your favourite editor, locate the RibbonDiffXml node, it is here that you need to apply your customization, you can find more details on how to customize a Ribbon in the CRM 2011 SDK. However here is one of mine:


<RibbonDiffXml>
  <CustomActions>
    <CustomAction Id="AP.Pharmacy.Form.CustomAction" Location="Mscrm.Form.hd_pharmacy.MainTab.Actions.Controls._children" Sequence="21">
      <CommandUIDefinition>
        <Button Id="AP.Pharmacy.Form.Button.AddPrescription" Command="AP.Pharmacy.Form.CommandDefinition.AddPrescription" LabelText="Add Prescription" ToolTipTitle="Add Prescription" ToolTipDescription="Lookup for patient and add Prescription" TemplateAlias="o1" Image16by16="/_imgs/ribbon/AddExistingStandard_16.png" Image32by32="/_imgs/ribbon/AddExistingStandard_32.png" />
      </CommandUIDefinition>
    </CustomAction>
    <CustomAction Id="AP.Pharmacy.HomepageGrid.CustomAction" Location="Mscrm.HomepageGrid.hd_pharmacy.MainTab.Actions.Controls._children" Sequence="21">
      <CommandUIDefinition>
        <Button Id="AP.Pharmacy.HomepageGrid.Button.AddPrescription" Command="AP.Pharmacy.HomepageGrid.CommandDefinition.AddPrescription" LabelText="Add Prescription" ToolTipTitle="Add Prescription" ToolTipDescription="Lookup for patient and add Prescription" TemplateAlias="o1" Image16by16="/_imgs/ribbon/AddExistingStandard_16.png" Image32by32="/_imgs/ribbon/AddExistingStandard_32.png" />
      </CommandUIDefinition>
    </CustomAction>
  </CustomActions>
  <Templates>
    <RibbonTemplates Id="Mscrm.Templates"></RibbonTemplates>
  </Templates>
  <CommandDefinitions>
    <CommandDefinition Id="AP.Pharmacy.HomepageGrid.CommandDefinition.AddPrescription">
      <EnableRules>
        <EnableRule Id="AP.contact.WebClient.EnableRule" />
        <EnableRule Id="AP.contact.grid.OneSelected.EnableRule" />
      </EnableRules>
      <DisplayRules>
        <DisplayRule Id="AP.contact.WebClient.DisplayRule" />
      </DisplayRules>
      <Actions>
        <JavaScriptFunction Library="$webresource:AA_/AddNewSample.js" FunctionName="AddNewRecordFromHomepageGrid">
          <CrmParameter Value="SelectedControlSelectedItemIds" />
          <CrmParameter Value="UserLcid" />
        </JavaScriptFunction>
      </Actions>
    </CommandDefinition>
    <CommandDefinition Id="AP.Pharmacy.Form.CommandDefinition.AddPrescription">
      <EnableRules>
        <EnableRule Id="AP.contact.WebClient.EnableRule" />
      </EnableRules>
      <DisplayRules>
        <DisplayRule Id="AP.contact.WebClient.DisplayRule" />
      </DisplayRules>
      <Actions>
        <JavaScriptFunction Library="$webresource:AA_/AddNewSample.js"   FunctionName="AddNewRecordFromForm">
          <CrmParameter Value="FirstPrimaryItemId" />
          <CrmParameter Value="UserLcid" />
        </JavaScriptFunction>
      </Actions>
    </CommandDefinition>
  </CommandDefinitions>
  <RuleDefinitions>
    <TabDisplayRules />
    <DisplayRules>
      <DisplayRule Id="AP.contact.WebClient.DisplayRule">
        <CrmClientTypeRule Type="Web" />
      </DisplayRule>
      <DisplayRule Id="AP.contact.form.FormStateNotNew.DisplayRule">
        <FormStateRule State="Create" InvertResult="true" />
      </DisplayRule>
    </DisplayRules>
    <EnableRules>
      <EnableRule Id="AP.contact.WebClient.EnableRule">
        <CrmClientTypeRule Type="Web" />
      </EnableRule>
      <EnableRule Id="AP.contact.form.NotNew.EnableRule">
        <FormStateRule State="Create" InvertResult="true" />
      </EnableRule>
      <EnableRule Id="AP.contact.grid.OneSelected.EnableRule">
        <SelectionCountRule AppliesTo="SelectedEntity" Maximum="100" Minimum="1" />
      </EnableRule>
    </EnableRules>
  </RuleDefinitions>
  <LocLabels />
</RibbonDiffXml>

As you can see in the highlighted part you can call a javascript function that must be a web resource and pass parameter to this function, here there are only three parameter shown, you can find more on the SDK. So once you click the button this function gets called and then from there you can call the HTML page that hosts the Silverlight application and pass those parameters to Silverlight.
Hope this helps.

07 April 2011

How to create labels for different languages

In this blog post I will show how to create different labels for different languages for an optionset attribute.
First of all we need to export translations from CRM: navigate to settings -> customize the system and then click export translations.


This will download two xml files.


Open the larger with Excel and edit the translated labels for the desired attributes as shown below, this is only a small part of the content.


So, the first column(A) shows the the name of the optionset that you want to translate, the second column contains the unique ID, the third column says which part of the optionset is going to be translated (e.g. DisplayName, Description) the other columns are the columns reserved for the languages. As you can see from column D to column F and forth, if you had more languages Installed on your CRM, you can find all the languages listed. Just create your own translations for the language you need, you will find then these translations available in code as I shown in a previous post.
Hope I haven't been confusing you, likely the image is pretty self  explanatory :).
Cheers guys.

06 April 2011

Passing data from a Form to an embedded Silverlight web resource.

In this post I will show how to pass data to an embedded Silverlight web resource.
When you add a Silverlight Web resource to a form you can select the Pass record object-type code and unique identifier as parameters option. You can also pass a custom parameter(data)as a string.


These values are passed to the Silverlight control as InitParameter.
We can then access these InitParameter from our SilverlightPage.xaml.cs, there are 7 parameters that we can access in this way:

// The unique identifier of the record
string recordGuid = App.Current.Host.InitParams["id"];

//The entity type code. For custom entities this can vary between organizations.
string type= App.Current.Host.InitParams["type"];

//The logical name of the entity.string logicName= App.Current.Host.InitParams["typename"];

//The name of the organizationstring orgName= App.Current.Host.InitParams["orgname"];

//The language code representing the user's language preference
string userLcid= App.Current.Host.InitParams["userlcid"];

//The language code representing the organization's base language
string orgLcid= App.Current.Host.InitParams["orglcid"];

 //The value of the text entered as a custom parameter
string data= App.Current.Host.InitParams["data"];


In a very recent post I talked about
how to retrieve different optionset labels for different languages, well that time I have only shown how to retrieve the labels. Now you can combine these two posts to get the language code you need to retrieve your customized labels.
This mechanism works fine only if the Silverlight web resource is embedded in an entity form, in order to be able to access crm contextual information from outside the form context, we need to configure the HTML page hosting the Silverlight control to access the Crm context by adding a reference to ClientGlobalContext.js and add the HTML page as a web resource as well.


How to retrieve labels from an optionset attribute for different languages.

In this post I will show how to retrieve optionset labels and descriptions from CRM 2011 for different languages.
I assume that you already have the translated labels for the optionset you want to retrieve. I will show how to create different labels for different languages in another post.

Here is the code to retrieve labels and descriptions for one particular language or all languages if you wanted.

public List<yourObject> GetAdditionalentitlementList(int languageCode){List<yourObject> yourObjectList= new List<yourObject>();           

yourObject yourObject;
RetrieveAttributeRequest retrieveAttributeRequest = new RetrieveAttributeRequest 
             {
                 EntityLogicalName = Contact.EntityLogicalName,
                 LogicalName = "yourAttributeName",
               

                 RetrieveAsIfPublished = true
             };
// Execute the request.         
RetrieveAttributeResponse retrieveAttributeResponse = (RetrieveAttributeResponse)_orgService.Execute(retrieveAttributeRequest);           
// Access the retrieved attribute. 
 Microsoft.Xrm.Sdk.Metadata.
PicklistAttributeMetadata retrievedPicklistAttributeMetadata =
 (Microsoft.Xrm.Sdk.Metadata.PicklistAttributeMetadata) 
            retrieveAttributeResponse.AttributeMetadata;// Get the current options list for the retrieved attribute.
OptionMetadata[] optionList = retrievedPicklistAttributeMetadata.OptionSet.Options.ToArray();
       foreach (OptionMetadata oMD in optionList)
            {
                yourObject= new yourObject();
                foreach (var item in oMD.Label.LocalizedLabels)
                {
                    if (item.LanguageCode == languageCode)
                    {
                        yourObject.Label = item.Label;
                        yourObject.Value = oMD.Value.Value;
                       
                        break;
                    }
                }
                foreach (var description in oMD.Description.LocalizedLabels)
                {
                    if (description.LanguageCode == languageCode)
                    {
                        yourObject.Description = description.Label;
                        break;
                    }
                }
                yourObjectList.Add(yourObject);
            }

            return yourObjectList;
}


public class yourObject
{       public string Label { get; set; }
        public int Value { get; set; }
        public string  Description { get; set; }
        public override string ToString()
        {
            return this.Label;
        }
}


I hope this helps someone!!!